Select Page
Bluebell Sunhat

Bluebell Sunhat

It is week 22 of our Year of Hats!!! Unbelievable! May I present:

The Bluebell Sunhat 🙂

My kids now officially each have a handmade sunhat, and unless inspiration for another unique sunhat suddenly strikes, I think this will conclude the sunhat line for this year. Is it weird that I am yearning for heat and summer, but am craving to make stuff for fall? Probably…

The Bluebell Sunhat sets itself apart with a beautiful doily feature on the top and a flared, large brim. I haven’t used anything to stiffen the brim, but I think I might still, so the flare of the brim can really shine. 

Have fun with this pattern, maybe you could use some other doily designs and turn them into a sunhat?!

Size:

Toddler (18-19” head circumference)

Child (20-22” head circumference)

Adult (22-23” head circumference)


Gauge: 10 dc/6 dc rows in 2”

Materials:

Yarn: Sport weight yarn.

Sample was made in Schachenmayr Catania  (100% Cotton; 136 yards/50grams)

(2, 2, 3 skeins)

Hooks: D/3.25mm

Other: Darning needle to weave in the ends


Abbreviations:

Ch – Chain(s)

Yo –Yarn Over

Sk – Skip

Ch-sp – Chain-Space

St(s) – Stitch(es)

Slst – Slip Stitch

Dc – Double Crochet

2dc inc – 2 Double Crochet into Same Stitch


Notes:

  • The beginning ch ALWAYS counts as a dc;


Special Stitches:

Bobble:

*Yo, put hook into stitch and draw up a loop, yo and pull through 2 loops (2 loops remain on hook); repeat from *2 more times, yo, pull through all four loops.


Fan:

[1hdc, 3dc, 1hdc] all into one stitch


Instructions:


{Doily}

Round 1:      Ch5, [dc, ch1]7 times into 1st ch, slst to 4th of beginning ch5. (8dc, 8ch-sp)

Round 2:      Ch4 (counts as dc & ch1), dc into 1st ch-sp, ch1, (dc, ch1) into each dc and ch-sp around,                        slip to 3rd of beginning ch4. (16dc, 16 ch-sp)

Round 3:      Ch3, dc2tog into same ch as slst (count as bobble), ch2, [bobble into next dc, ch2] 15                                times, slst to top of first bobble (16 bobbles)

Round 4:      Ch3, 3dc into 1st ch-sp, [dc into next bobble, 3dc into next ch-sp] 15 times, slst to top of                        ch3. (64dc)

Round 5:      Ch3, [dc, hdc] into same st as slst, sk 1dc, sc into next dc, [sk1dc, fan into next dc, sk1dc,                      sc into next dc]15 times, sk 1dc, [hdc, dc] into same st as slst at the end of previous                                round, slst to top of ch3. (16 fans)

[/et_pb_column]

{Body}

Round 6:      Ch1, sc in same st as slst, ch5, [sc into center dc of next fan, ch5] 15 times, slst to 1st sc.                        (16 ch5-sp)

Round 7:     

Toddler:       Slst into first ch5-sp, ch3, 5dc into same ch5-sp, [5dc into next ch5-sp, 6dc into next                            ch5-sp] repeat around, slst to top of ch3.

Child:           Slst into first ch5-sp, ch3, 5dc into same ch5-sp, 6dc into each ch5-sp, slst to top of ch3.

Adult:          Slst into first ch5-sp, ch3, 5dc into same ch5-sp, [7dc into next ch5-sp, 6dc into next                            ch5-sp] repeat around, slst to top of ch3


Round 8:      Ch3, dc in each dc around, join to top of ch3.


Repeat round 8 (11, 13, 15) more times, or to desired length. (88, 96, 104 dc)


{Brim}

Round 1:      Ch3, dc2, 2dcinc, [dc3, 2dcinc] repeat around, join to top of ch3.

Round 2:      Ch3, dc1, 2dcinc, [dc4, 2dcinc] repeat until 2 sts remain, dc2, join to top of ch3.

Round 3:      Ch3, dc4, 2dcinc, [dc5, 2dcinc] repeat around, join to top of ch3.

Round 4:      Ch3, dc2, 2dcinc, [dc6, 2dcinc] repeat until 3 sts remain, dc3, join to top of ch3.


Stop increasing for Toddler size.


Round 5:      Ch3, dc6, 2dcinc, [dc7, 2dcinc] repeat around, join to top of ch3.

Round 6:      Ch3, dc3, 2dcinc, [dc8, 2dcinc] repeat until 4 sts remain, dc4, join to top of ch3.


Stop increasing for Child size.


Round 7:      Ch3, dc7, 2dcinc, [dc9, 2dcinc] repeat around, join to top of ch3.

Round 8:      Ch3, dc4, 2dcinc, [dc10, 2dcinc] repeat until 5 sts remain, dc5, join to top of ch3.


Cut yarn and weave in ends.


You’re done 🙂


If you would like to get the color coded downloadable PDF version of this pattern, you can find it here on Ravelry.

I hope you enjoy this pattern. Maybe you even want to try turning another doily/granny square into a hat? That would be so neat and I would love to see it. Share with me on Social Media!!


Don’t forget to subscribe so you don’t miss out on the weekly free patterns!

Have a happy crafty weekend,


Emma
Lilac Sunhat

Lilac Sunhat

It is week number 21 in the Year of Hats!! This week I have another cute sunhat for you! My girls all need one, so there is at least one more to come, and the boy’s sunhat was last week’s pattern.

The Lilac sunhat is a little different for sizes. Please read the notes carefully before you start. 

I hope you enjoy this pattern and don’t forget to subscribe for a new free pattern every week! 🙂


Size:

Toddler/Small Kid (18-20” head circumference)

Big Child/Adult (21-22” head circumference)


Gauge: 10 sc/12 sc rows in 2”

Materials:

Yarn: Sport weight yarn.

Sample was made in Schachenmayr Catania Color (180) Serenity (136 yards/50grams) (2 skeins)

Hooks: D/3.25mm

Other: Darning needle to weave in the ends

Abbreviations:

Ch – Chain(s)

Yo –Yarn Over

Sk – Skip

Ch2sp – Chain 2 Space

St(s) – Stitch(es)

Slst – Slip Stitch

Dc – Double Crochet

2dc inc – 2 Double Crochet into Same Stitch


Notes:

  • SIZES: This hat is stretchy. The smaller size fits Toddler up to age 6-7 comfortably in the width. The larger size will fit an older child and up to a small Adult. If you would like to make the hat bigger, I suggest using a 3.5mm crochet hook;
  • Ch2 at the beginning of each round DOES count as a stitch;
  • Always join to 3rd ch of the beginning chain;
  • DO NOT TURN your work after each round;
  • Always skip ch2sp when working the body, until the first round of the brim;
  • *Treat ch2sp as 2 dc in the first round of the brim!*:

Instructions:


Toddler/Small Kid:

Ch5, join with slst into first ch.

Round 1:      Ch3 (counts as dc), dc 23 into ring you just formed; join to top of ch-3

Round 2:      Ch3, dc in next 2 sts, (ch2, dc in next 3 sts) 7 times, ch2, join.

Round 3:      Ch3, dc into same st (base of ch), dc 1, 2dc inc, (ch2, 2dc inc, dc1,                                                2dc inc) 7 times, ch2, join. (Work into dc only and skip ch2sp here and in every round                      until you reach the brim.)

Round 4:      Ch3, dc into same st, dc 3, 2dc inc, (ch2, 2dc inc, dc3, 2dc inc) 7 times,                                         ch2, join.

Round 5:      Ch3, dc into same st, dc 5, 2dc inc, (ch2, 2dc inc, dc5, 2dc inc) 7 times,                                         ch2, join.

Round 6:      Ch3, dc in next 8, (ch2, dc in next 9) 7 times, ch2, join.

Repeat round 6 12 more times for a toddler, 13 more times for a child ages 4-7 (or to desired lenth). Continue with Brim.


Big kid/Adult:

See smaller size instructions for step by step pictures.

Ch5, join with slst into first ch.

Round 1:      Ch3 (counts as dc), dc 23 into ring you just formed; join to top of ch-3

Round 2:      Ch3, dc in next 2 sts, (ch2, dc in next 3 sts) 7 times, ch2, join.

Round 3:      Ch3, dc into same st (base of ch), dc 1, 2dc inc, (ch2, 2dc inc, dc1,                                                2dc inc) 7 times, ch2, join.

Round 4:      Ch3, dc into same st, dc 3, 2dc inc, (ch2, 2dc inc, dc3, 2dc inc) 7 times,                                         ch2, join.

Round 5:      Ch3, dc into same st, dc 5, 2dc inc, (ch2, 2dc inc, dc5, 2dc inc) 7 times,                                         ch2, join.

Round 6:      Ch3, dc into same st, dc 7, 2dc inc, (ch2, 2dc inc, dc7, 2dc inc) 7 times,                                         ch2, join.

Round 7:      Ch3, dc in next 10,           (ch2, dc in next 11) 7 times, ch2, join.


Repeat round 7 15 more times (or to desired length). Continue with Brim.


Brim:


Round 1:      Ch3, 2dc inc in next st, dc 1, 2dc inc, dc 3, 2dc inc, [(dc 1, 2dc inc)twice,                                      dc 3, 2dc inc] repeat around, join. *See NOTE: treat ch2sp as 2 dc*

Round 2:      Ch3, dc 1, 2dc inc, dc 2, 2dc inc, dc 4, 2dc inc, [(dc 2, 2dc inc) twice, dc                                       4, 2dc inc] repeat around, join.

Round 3:      Ch3, dc 4, 2dc inc, (dc 3, 2dc inc) twice, [dc 5, 2dc inc, (dc 3, 2dc inc)                                         twice] repeat around, join.

Round 4:      Ch3, dc 3, 2dc inc, dc 4, 2dc inc, dc 6, 2dc inc, [(dc 4, 2dc inc) twice,                                           dc 6, 2dc inc] repeat around, join.

Round 5:      Ch3, dc 6, 2dc inc, (dc 5, 2dc inc) twice, [dc 7, 2dc inc, (dc 5, 2dc inc)                                         twice] repeat around, join.

STOP INCREASING FOR SMALLER SIZE.

Round 6:      Ch3, dc 5, 2dc inc, dc 6, 2dc inc, dc 8, 2dc inc, [(dc 6, 2dc inc) twice, dc                                       8, 2dc inc] repeat around, join.

Round 7:      Ch3, dc 8, 2dc inc, (dc 7, 2dc inc) twice, [dc 9, 2dc inc, (dc 7, 2dc inc)                                         twice] repeat around, join.


Cut yarn and weave in all ends.


You’re done 🙂

If you would like to get the downloadable PDF version of this pattern, you can find it here on Ravelry.


Please, leave me a comment 🙂 


Have a happy, crafty weekend and until next week!

Emma

Newsboy Hat

Newsboy Hat

It is week 20 in the Year of Hats!!! 20 weeks, 20 patterns. ALMOST half way to 52, which also means the year is almost half over. Have you started your Christmas shopping yet?! LOL

For this pattern, my vision was to design a beautiful newsboy/train conductor hat that could be used as a summer or sunhat. It is made ideally from cotton and sport weight yarn, so it is not too heavy and doesn’t heat up the head too much. Obviously, it won’t have UV protection, but the wide brim protects the face and the hat is long enough to be pulled over the ears for wind protection. 

We live in a place where the sun is strong and so is the wind, so I think this hat will get lots of wear 🙂 Also, and maybe most importantly, it is super cute!!! 

Hopefully, you can see from the pictures how beautifully this hat sits. My goal was to get the “balloon-ey” look that the original newsboy hats used to have and I am really happy with the result.  

There was a moment when I questioned my intelligence, thinking I could photograph this little whirlwind and actually get a sharp usable shot with the hat still on. What was I thinking! The “balloon-ey” effect got all squished and there was no way he would have let me fiddle to get it just right for the pictures, but hey –  I am a bit in shock that the pictures actually came out beautiful 🙂 We even got one without a soother! The whole “shoot” lasted about 30 seconds. #strugglesofamommyblogger


Anyway, enough babbling, here is the pattern. Beware, it is a lengthy one. But SO worth it. I do recommend the PDF for this one, because

the PDF download includes the button tutorial

and will be easier to navigate but here it is free and complete:


PATTERN:


Size:

Toddler (18-19” head circumference)

Child (20-22” head circumference)

Adult (22-23” head circumference)


Gauge: 10 hdc/8 hdc rows in 2”

Materials:

Yarn: Sport weight yarn.

Sample was made in KnitPicks Shine Sport (110 yards/50 gr) 3 skeins

Hooks: D/3.25mm

Other:

–       Darning needle to weave in the ends;

–       Crochet covered button (tutorial here)

–       Stitch marker

Abbreviations:

Ch – Chain(s)

MR – Magic Ring (Loop)

St(s) – Stitch(es)

Slst – Slip Stitch

Sc – Single Crochet

Hdc – Half Double Crochet

Fpdc – Front Post Double Crochet

Hdc2tog – Half Double Crochet Two Stitches Together

RS – Right Side


Notes:


  • Please read all of the instructions and notes. It might seem like a lot but it is necessary to get the result you want.
  • Because of the beautiful ridges this hat features, it is difficult to adjust for sizes. The child size might be off by a bit due to that. My suggestion is to chain 96, and then try it around your child’s head (or measure the length). If it is a bit lose, consider going down a hook size to get the right fit.
  • Ch2 at the beginning of each round does not count as a stitch.
  • Always join to first st of the round.
  • Read carefully where to turn your work and where not to.
  • When attaching the brim to the hat, you will sc through both layers of the brim and the beginning ch of the hat. See section “Finishing” for position of the brim.

Instructions:


Toddler:

(BAND)

Ch 84, join to first ch

Round 1(RS): Ch1, sc in each ch, join.

Round 2:      Ch1, (slst1, hdc1) around, join, turn.

Round 3:      Ch1, (hdc1, slst1) around, join, turn.

Rounds 4-7:  Repeat rounds 2-3 two times. After round 7, DO NOT TURN.


(BODY)

Round 8:      Ch1, sc in each st, join.

Round 9:      Ch1, (hdc5, 3hdc increase in next stitch, hdc5, (2hdc, fpdc) all into next stitch) 7 times,                          join.

Round 10:    Ch1, (hdc15, fpdc) repeat around, join.

Round 11-26: Repeat Round 10.


(DECREASE)

Round 27:    Ch1, (hdc6, hdc2tog, hdc5, hdc2tog, fpdc) 7 times, join.

Round 28:    Ch1, (hdc5, hdc2tog, hdc4, hdc2tog, fpdc) 7 times, join.

Round 29:    Ch1, (hdc4, hdc2tog, hdc3, hdc2tog, fpdc) 7 times, join.

Round 30:    Ch1, (hdc3, hdc2tog, hdc2, hdc2tog, fpdc) 7 times, join.

Round 31:    Ch1, (hdc2, hdc2tog, hdc, hdc2tog, fpdc) 7 times, join.

Round 32:    Ch1, (hdc, hdc2tog, hdc2tog, fpdc) 7 times, join.

Round 33:    Ch1, (hdc, hdc2tog, fpdc) 7 times, join.


Cut yarn leaving a long tail, weave through remaining stitches and pull hole closed. Weave in/secure yarn tail inside the hat.


Continue to “ALL SIZES”.


Child:

(BAND)

Ch 96, join to first ch

Round 1(RS): Ch1, sc in each ch, join.

Round 2:      Ch1, (slst1, hdc1) around, join, turn.

Round 3:      Ch1, (hdc1, slst1) around, join, turn.

Rounds 4-9:  Repeat rounds 2-3 three times. After round 9, DO NOT TURN.


(BODY)

Round 10:    Ch1, sc in each st, join.

Round 11:    Ch1, (hdc5, 3hdc increase in next stitch, hdc5, (2hdc, fpdc) all into next stitch) 8 times,                           join.

Round 12:    Ch1, (hdc15, fpdc) repeat around, join.

Round 13-29: Repeat Round 12.


(DECREASE)

Round 30:    Ch1, (hdc6, hdc2tog, hdc5, hdc2tog, fpdc) 8 times, join.

Round 31:    Ch1, (hdc5, hdc2tog, hdc4, hdc2tog, fpdc) 8 times, join.

Round 32:    Ch1, (hdc4, hdc2tog, hdc3, hdc2tog, fpdc) 8 times, join.

Round 33:    Ch1, (hdc3, hdc2tog, hdc2, hdc2tog, fpdc) 8 times, join.

Round 34:    Ch1, (hdc2, hdc2tog, hdc, hdc2tog, fpdc) 8 times, join.

Round 35:    Ch1, (hdc, hdc2tog, hdc2tog, fpdc) 8 times, join.

Round 36:    Ch1, (hdc, hdc2tog, fpdc) 8 times, join.


Cut yarn leaving a long tail, weave through remaining stitches and pull hole closed. Weave in/secure yarn tail inside the hat.


Continue to “ALL SIZES”.


Adult:

(BAND)

Ch 104, join to first ch

Round 1(RS): Ch1, sc in each ch, join.

Round 2:      Ch1, (slst1, hdc1) around, join, turn.

Round 3:      Ch1, (hdc1, slst1) around, join, turn.

Rounds 4-11:         Repeat rounds 2-3 four times. After round 11, DO NOT TURN.


(BODY)

Round 12:    Ch1, sc in each st, join.

Round 13:    Ch1, (hdc5, 3hdc increase in next stitch, hdc5, 3hdc increase in next stitch, fpdc) 8                          times, join.

Round 14:    Ch1, (hdc16, fpdc) repeat around, join.

Round 15-32: Repeat Round 14.


(DECREASE)

Round 33:    Ch1, (hdc6, hdc2tog, hdc6, hdc2tog, fpdc) 8 times, join.

Round 34:    Ch1, (hdc5, hdc2tog, hdc5 hdc2tog, fpdc) 8 times, join.

Round 35:    Ch1, (hdc4, hdc2tog, hdc4, hdc2tog, fpdc) 8 times, join.

Round 36:    Ch1, (hdc3, hdc2tog, hdc3, hdc2tog, fpdc) 8 times, join.

Round 37:    Ch1, (hdc2, hdc2tog, hdc2, hdc2tog, fpdc) 8 times, join.

Round 38:    Ch1, (hdc, hdc2tog, hdc, hdc2tog, fpdc) 8 times, join.

Round 39:    Ch1, (hdc2tog, hdc2tog, fpdc) 8 times, join.


Cut yarn leaving a long tail, weave through remaining stitches and pull hole closed. Weave in/secure yarn tail inside the hat.


Continue to “ALL SIZES”.


 ALL SIZES:

(BRIM)

Ch 60 (68, 72), join to first ch. Place the stitch marker into the first sc of the round and do not join your rounds.

Now work 9 (10, 11) rounds in sc, decreasing by 2 in every round. You should have left 42 (48, 50) stitches.


Cut a long tail. Turn brim inside out and whip stitch shorter opening closed through the outer loops. Weave in the end.

Turn right side out and press/block. (If you like, you can add interfacing to the inside of the brim on one side.)


(FINISHING)

Find the center back (where you started your beginning ch) and join the yarn from the RS of the hat (pic). Working into unused loop of the beginning ch, sc 27 (31, 34), then sc 30 (34, 36) attaching the brim (see Notes), then sc 27 (31, 34), join. Cut yarn and weave in.

Weave in all remaining ends and attach covered button to the top of the hat. You can find the tutorial for the button here.


You’re done 🙂


If you would like to get the downloadable PDF version of this pattern (including the button tutorial), you can find it here on Ravelry.

I hope you have lots of fun with this pattern! Leave me a comment 🙂 

Don’t forget to subscribe! There is a new free hat pattern released every week! 


Have a happy, crafty weekend and until next week!

Emma

Disclaimer: This post contains affiliate links.

This means that at no additional cost to you, I might earn a small commission if you choose to click through and make a purchase. 

Crochet Covered Button

Crochet Covered Button

This is a step by step tutorial on how to make a crochet covered button like the one in the above picture. I provided a list of materials but with this “recipe”, you will be able to cover any button with any yarn 🙂

I used this button on the Newsboy Hat. These instructions are part of the download package if you decide to buy the PDF copy on Ravelry.

 Have fun and please don’t hesitate to contact me with any questions you might have!

Abbreviations:

MR – Magic Ring

St(s) – Stitch(es)

Sc – Single Crochet

Pm – Place Marker

Sc2tog – Single Crochet 2 Together

Inc – Increase


Materials:

  • You can use any yarn that matches your project. Be sure to take a smaller crochet hook than is recommended for that yarn.
  • Sample was made with sport weight yarn and 2.75mm hook.
  • Button with a bottom loop

Instructions:

Make a MR

  1. 6sc into ring, pm
  2. 2 sc inc. in each st

Keep increasing your stitch count with every round until your button fits into the circle. To do that you will always add one sc more between increases in every round. For example:

Round 3: (sc, 2sc inc.)6x             Round 4: (sc2, 2sc inc.)6x                    Round 5: (sc3, 2sc inc.)6x etc.

My button was covered after round 3.


  1. sc in each st around.

Round 5:      (sc, sc2tog) 6x

Cut the yarn leaving a long tail and thread on a darning needle. Weave yarn back and forth through the stitches of the last round and pull together.

Use the yarn tail to sew the button unto your project.

You’re done! 


I hope you find this tutorial helpful and enjoy making lots of covered buttons. Don’t forget to tag me to be featured on social media @snowdropcrochet


Happy Crochet,


Emma

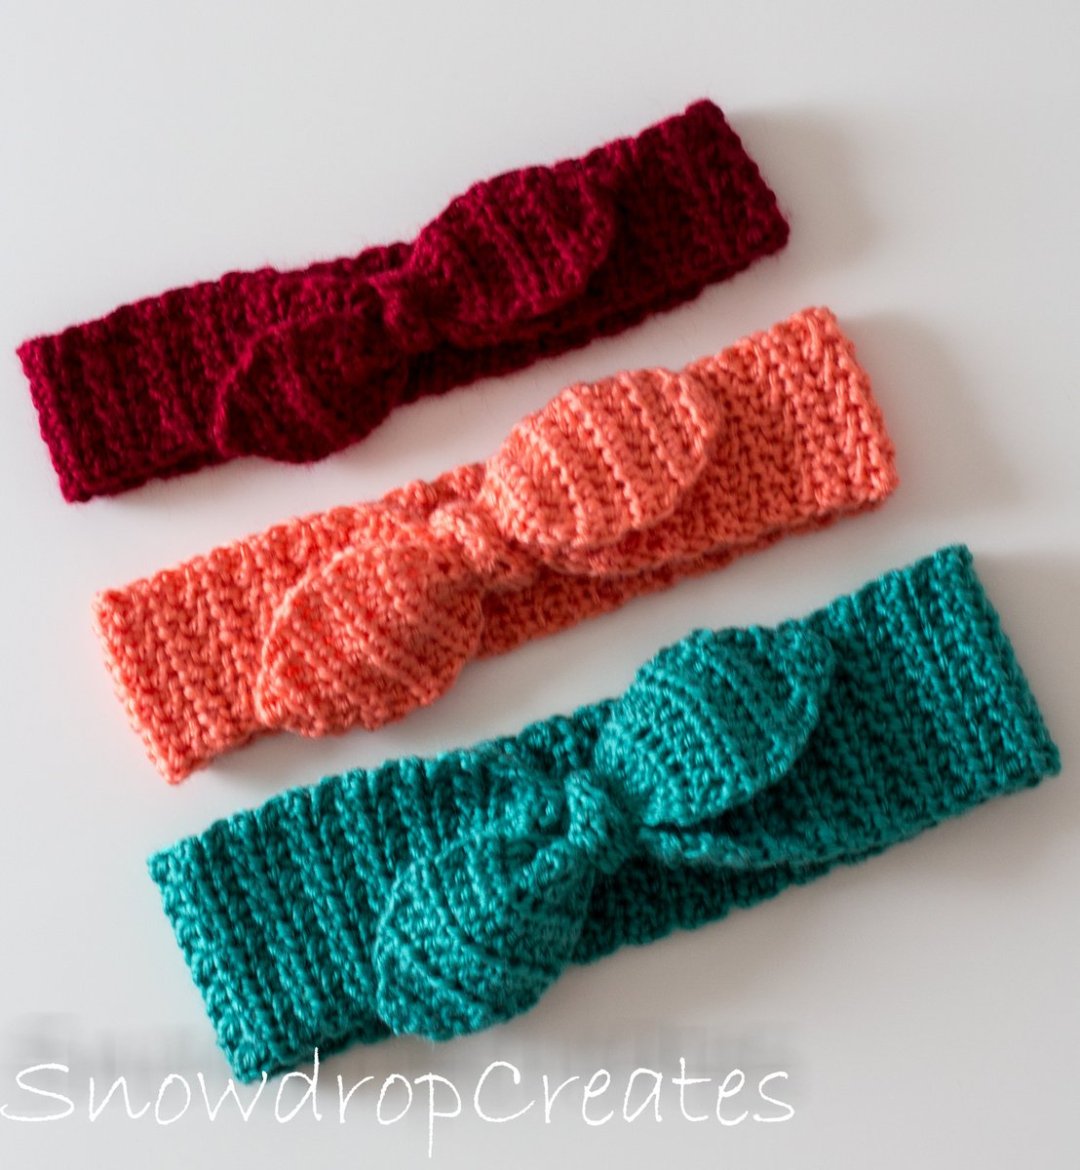
Pretty Bow Headband

Pretty Bow Headband

It’s a long weekend over here and I am sitting at a craft day with my gals. One of my favourite things to do 🙂 Of course, when a bunch of women come together to craft it’s not really about being super efficient or productive, but it makes the crafting even more fun! 

The Pretty Bow Headband is the perfect weekend/evening project. It makes a cute gift for any girl in your life and is also a great project for craft fairs if you sell your crochet items.

The pattern is super simple and the instructions take you through it row by row. I can’t wait to see what you make with this, so PLEASE share on Instagram, Facebook, or Ravelry!

Size:

Toddler (18-19” head circumference)

Child (20-22” head circumference)

Adult (22-23” head circumference)


Gauge: 11 sts/6 rows (in pattern) in 2”

Materials:

Yarn: Worsted weight yarn.

Sample was made in KnitPicks Brava

(218 yards/100grams) 1 skein

Hooks: H/4.5mm

Other: Darning needle to weave in the ends

Abbreviations:

Ch – Chain(s)

St(s) – Stitch(es)

Slst – Slip Stitch

Hdc – Half Double Crochet

Hdc2tog – Half Double Crochet Two Stitches Together (decrease)

Hdc3tog – Half Double Crochet Three Stitches Together

FLO – Front Loop Only

BLO – Back Loop Only

Inc – Increase by putting 2 hdc into the same stitch


Notes:

  • Chains at the beginning of each round do not count as a stitch;
  • Increase: work two hdc into the stitch indicated;
  • Turn after each row;
  • To customize the size of the headband, crochet the repeating row until the main part of the headband fits around your head with a bit of stretching before you decrease. The number of rows are provided as a guideline, but depending on your yarn/fiber/size you might need more or less.


Instructions:


Toddler:

Row 1:         Ch3, 3 hdc in first ch, turn (3 sts)

Row 2:         Ch2, inc, hdc, inc, turn (5 sts)

Row 3:         Ch2, inc, hdc 3, inc, turn (7 sts)

Row 4-6:      Ch2, hdc 7, turn

Row 7:         Ch2, hdc2tog, hdc 3, hdc2tog, turn (5 sts)

Row 8:         Ch2, hdc2tog, hdc, hdc2tog, turn (3 sts)

Row 9-10:    Ch2, hdc3, turn

Row 11:       Ch2, inc, hdc, inc, turn (5 sts)

Row 12:       Ch2, inc, hdc blo, hdc flo, hdc blo, inc, turn (7 sts)

Row 13:       Ch2, inc, (hdc flo, hdc blo) twice, hdc flo, inc, turn (9 sts)

Row 14 – 63:                    Ch2, (hdc flo, hdc blo) 4 times, hdc flo, turn (50 rows)

Row 64:       Ch2, hdc2tog, (hdc flo, hdc blo)twice, hdc flo, hdc2tog, turn (7 sts)

Row 65:       Ch2, hdc2tog, hdc blo, hdc flo, hdc blo, hdc 2tog, turn (5 sts)

Row 66:       Ch2, hdc2tog, hdc, hdc2tog, turn (3 sts)

Row 67-68: Ch2, hdc 3

Row 69:       Ch2, inc, hdc, inc, turn (5 sts)

Row 70:       Ch2, inc, hdc 3, inc, turn (7 sts)

Row 71-73: Ch2, hdc 7, turn

Row 74:       Ch2, hdc2tog, hdc 3, hdc2tog, turn (5 sts)

Row 75:       Ch2, hdc2tog, hdc, hdc2tog, turn (3 sts)

Row 76:       Ch2, hdc3tog

Cut yarn, weave in ends.


Child:

Row 1:         Ch3, 3 hdc in first ch, turn (3 sts)

Row 2:         Ch2, inc, hdc, inc, turn (5 sts)

Row 3:         Ch2, inc, hdc 3, inc, turn (7 sts)

Row 4:         Ch2, inc, hdc 5, inc, turn (9 sts)

Row 5-7:      Ch2, hdc 9, turn

Row 8:         Ch2, hdc2tog, hdc 5, hdc2tog, turn (7 sts)

Row 9:         Ch2, hdc2tog, hdc 3, hdc2tog, turn (5 sts)

Row 10:       Ch2, hdc2tog, hdc, hdc2tog, turn (3 sts)

Row 11-12:  Ch2, hdc3, turn

Row 13:       Ch2, inc, hdc, inc, turn (5 sts)

Row 14:       Ch2, inc, hdc blo, hdc flo, hdc blo, inc, turn (7 sts)

Row 15:       Ch2, inc, (hdc flo, hdc blo) twice, hdc flo, inc, turn (9 sts)

Row 16:       Ch2, inc, (hdc blo, hdc flo) 3 times, hdc blo, inc, turn (11 sts)

Row 17-69: Ch2, (hdc blo, hdc flo) 5 times, hdc blo, turn (53 rows)

Row 70:       Ch2, hdc2tog, (hdc blo, hdc flo) 3 times, hdc blo, hdc2tog, turn (9 sts)

Row 71:       Ch2, hdc2tog, (hdc flo, hdc blo)twice, hdc flo, hdc2tog, turn (7 sts)

Row 72:       Ch2, hdc2tog, hdc blo, hdc flo, hdc blo, hdc 2tog, turn (5 sts)

Row 73:       Ch2, hdc2tog, hdc, hdc2tog, turn (3 sts)

Row 74-75:  Ch2, hdc3, turn

Row 76:       Ch2, inc, hdc, inc, turn (5 sts)

Row 77:       Ch2, inc, hdc 3, inc, turn (7 sts)

Row 78:       Ch2, inc, hdc 5, inc, turn (9 sts)

Row 79-81: Ch2, hdc 9, turn

Row 82:       Ch2, hdc2tog, hdc 5, hdc2tog, turn (7 sts)

Row 83:       Ch2, hdc2tog, hdc 3, hdc2tog, turn (5 sts)

Row 84:       Ch2, hdc2tog, hdc, hdc2tog, turn (3 sts)

Row 85:       Ch2, hdc3tog

Cut yarn, weave in ends.


Adult:

Row 1:         Ch3, 3 hdc in first ch, turn (3 sts)

Row 2:         Ch2, inc, hdc, inc, turn (5 sts)

Row 3:         Ch2, inc, hdc 3, inc, turn (7 sts)

Row 4:         Ch2, inc, hdc 5, inc, turn (9 sts)

Row 5-7:      Ch2, hdc 9, turn

Row 8:         Ch2, hdc2tog, hdc 5, hdc2tog, turn (7 sts)

Row 9:         Ch2, hdc2tog, hdc 3, hdc2tog, turn (5 sts)

Row 10:       Ch2, hdc2tog, hdc, hdc2tog, turn (3 sts)

Row 11-12:  Ch2, hdc3, turn

Row 13:       Ch2, inc, hdc, inc, turn (5 sts)

Row 14:       Ch2, inc, hdc blo, hdc flo, hdc blo, inc, turn (7 sts)

Row 15:       Ch2, inc, (hdc flo, hdc blo) twice, hdc flo, inc, turn (9 sts)

Row 16:       Ch2, inc, (hdc blo, hdc flo) 3 times, hdc blo, inc, turn (11 sts)

Row 17:       Ch2, inc, (hdc flo, hdc blo) 4 times, hdc flo, inc, turn (13 sts)

Row 18-72:  Ch2, (hdc flo, hdc blo) 6 times, hdc flo, turn (56 rows)

Row 73:       Ch2, hdc2tog, (hdc flo, hdc blo) 4 times, hdc flo, dch2tog, turn (11 sts)

Row 74:       Ch2, hdc2tog, (hdc blo, hdc flo) 3 times, hdc blo, hdc2tog, turn (9 sts)

Row 75:       Ch2, hdc2tog, (hdc flo, hdc blo)twice, hdc flo, hdc2tog, turn (7 sts)

Row 76:       Ch2, hdc2tog, hdc blo, hdc flo, hdc blo, hdc 2tog, turn (5 sts)

Row 77:       Ch2, hdc2tog, hdc, hdc2tog, turn (3 sts)

Row 78-79:  Ch2, hdc3, turn

Row 80:       Ch2, inc, hdc, inc, turn (5 sts)

Row 81:       Ch2, inc, hdc 3, inc, turn (7 sts)

Row 82:       Ch2, inc, hdc 5, inc, turn (9 sts)

Row 83-85: Ch2, hdc 9, turn

Row 86:       Ch2, hdc2tog, hdc 5, hdc2tog, turn (7 sts)

Row 87:       Ch2, hdc2tog, hdc 3, hdc2tog, turn (5 sts)

Row 88:       Ch2, hdc2tog, hdc, hdc2tog, turn (3 sts)

Row 89:       Ch2, hdc3tog

Cut yarn, weave in ends.


You’re done 🙂


If you would like to get the downloadable PDF version of this pattern, you can find it here on Ravelry

I hope you have lots of fun with this pattern, and share with me on Social Media: Tag me and use hashtags #snowdropprettybow #snowdropcrochet #prettybowheadband to be featured! 

Don’t forget to subscribe! There is a new free hat pattern released every week! 


Have a happy, crafty weekend and until next week!

Emma

Disclaimer: This post contains affiliate links.

This means that at no additional cost to you, I might earn a small commission if you choose to click through and make a purchase. 

Daffodil Sunhat

Daffodil Sunhat

The Daffodil Sunhat has me dreaming of sun and the beach. I cannot wait and am counting the days until we can bathe in the sun and listen to the seagulls, kids playing in the water, the warm sand beneath my feet… I LOVE summer! 


This hat is designed with practicality and style in mind.

– The brim keeps the sun out of the eyes;

– Cotton yarn and lose stitches keep the head from getting too hot;

– The snug and low fit will make sure this hat stays put. (I cannot tell you how many hats we have lost to the wind…);

– Easy to adjust to your needs:

  • If you don’t want it to sit so low, just crochet fewer rounds than the pattern suggests before working the brim.
  • If you need more shade, keep adding rows to the brim.


Have fun with this pattern and leave a comment! I love getting feedback 🙂


PATTERN:

Size:

Toddler (18-19” head circumference)

Child (20-22” head circumference)

Adult (22-23” head circumference)


Gauge: 10 sc/12 sc rows in 2”

Materials:

Yarn: Sport weight yarn.

Sample was made in Schoeller & Stahl Limone (136 yards/50grams) (2 skeins)

Hooks: D/3.25mm

Other: Darning needle to weave in the ends

Abbreviations:

Ch – Chain(s)

MR – Magic Ring (Loop)

Yo –Yarn Over

Sk – Skip

Chsp – Chain Space

St(s) – Stitch(es)

Slst – Slip Stitch

Sc – Single Crochet

Dc – Double Crochet

Rev.Sc – Reverse Single Crochet or “Crab Stitch”


Special Stitches:


Reversed Single Crochet:       Worked just like a Single Crochet, except going towards the right                                                            instead of left of fabric. The Rev.sc is worked “backwards”.

Puff Stitch: (Yo, insert hook into stitch indicated, pull up a loop to height of hook) 4 times, yo, pull                          through all but last loop on hook, yo pull through last 2 loops.

Notes:

  • Ch2 at the beginning of each round does not count as a stitch.
  • Always join to first st of the round.
  • DO NOT TURN your work after each round.


Instructions:


Crown:

Make a MR.

Round 1:    Ch2, dc 9 into MR, join to first dc.

Round 2:    Ch2, (puff st, ch, puff st) 9 times, join to first puff st.

Round 3:    Ch2, *dc in first puff st, (puff st, ch, puff st) in chsp, sk next puff st; repeat from * 8                         times, join.

Round 4:    Ch2, *dc, dc in first puff st, (puff st, ch, puff st) in chsp, sk next puff st; repeat from * 8                     times, join.

Round 5:    Ch2, *dc 2, dc in first puff st, (puff st, ch, puff st) in chsp, sk next puff st; repeat from *                     8 times, join.

Round 6:    Ch2, *dc 3, dc in first puff st, (puff st, ch, puff st) in chsp, sk next puff st; repeat from *                     8 times, join.

Round 7:    Ch2, *dc 4, dc in first puff st, (puff st, ch, puff st) in chsp, sk next puff st; repeat from *                     8 times, join.

Round 8:    Ch2, *dc 5, dc in first puff st, (puff st, ch, puff st) in chsp, sk next puff st; repeat from *                     8 times, join.

Stop increasing for toddler sized hat.


Round 9:    Ch2, *dc 6, dc in first puff st, (puff st, ch, puff st) in chsp, sk next puff st; repeat from *                              8 times, join.

Stop increasing for child sized hat.


Round 10: Ch2, *dc 7, dc in first puff st, (puff st, ch, puff st) in chsp, sk next puff st; repeat from *                              8 times, join.

Stop increasing for adult sized hat.


Body:


Round 1:    Ch2, *dc 6, 7, 8, sk next puff st (puff st, ch, puff st) in chsp, sk next puff st;

                   repeat from * 8 times, join.


Repeat this round until the hat measures approximately 6.5, 7, 7.5“, or to desired length.


Brim:


Round 1:    Ch1, sc in each st around, join. (Do not sc into chsp, but DO sc into puff sts.)

Round 2:    Ch1, 2sc in each st around, join.

Round 3:    Ch1, sc in each st around, join.


Repeat round three 4, 6, 8 more times or until the desired width of the brim is achieved.


Finishing round:   Ch1, (rev.sc into stitch to the right) around.


At the end of the round, cut yarn and thread yarn end through needle. Put needle from front to back into first st of the round (pic1). Put needle from front to back again but through last stitch of the round (pic 2). You should have a neat invisible join now, and can secure/weave in all ends (pic 3).

You’re done! 


Thank you so much for your visit! Be sure to subscribe for a new FREE pattern every week and follow me on Social Media 🙂


If you would like to get the downloadable PDF version of this pattern, you can find it here on Ravelry

Have a happy, crafty weekend and until next week! 


Emma

Pin It on Pinterest